At my last session at Lake George I had a Close Shave with my SA Speeed Demons team mate Choco. As you can see from the footage I thought I was aware of all the sailors in my vicinity! I started off a few hundread meters from another sailor and followed. I passed them over the top and scanned back and forth for other sailors. You can see a slight haze in my luff pocket at 1:43 and then Choco appears. The nose of his board clipped the foot of my sail and if I had been a second later who knows what might have happened. There was no reason to stop and I was on a NM so I finished the run and caught up with Choco later.
I have never had such a close shave and I think the conditions were a contributor. You could sail fast on all tacks at a constant speed so 2 sailors could converge on a point from a long distance away being blissfully unaware of each other. Choco was hidden by my luff pocket and I was in his blind spot upwind.
Sunday, 26 February 2012
Tuesday, 14 February 2012
Vector Fins Delta Speed Weed
I purchased a couple of Delta Weed Speeds recently for a last minute trip to Lake George. The 2 fins chosen were the 23(40 degree rake) to go with my JP 49 and 6.2/5m RS Racings and the 27(35 degree rake) to go with my Falcon 89 and 6.7/6.2 RS Racings.

I paid a little extra to get the fins overnight from Jesper at Vector Fins Australia as I needed them by the following day. I read on the Vector Fins International site that the weed speed came in both 40 and 45 degree rakes so I was suprised when the 27 was only 35 degrees(leading edge). With the extra length I hoped it would not pick up too much weed. The tip is slightly swept for the last 50mm so this is effectively more rake in the area prone to catching weed. This tip is also the only area with any twist or flex which is the way I like it! The fins are very well finished without any clearcoat on the foil to hide the contour lines. The base is cast in PU which is easy to sand for a perfect fit in the box.


27 @ 35 degree rake + 23 @ 40 degree rake.
I paid a little extra to get the fins overnight from Jesper at Vector Fins Australia as I needed them by the following day. I read on the Vector Fins International site that the weed speed came in both 40 and 45 degree rakes so I was suprised when the 27 was only 35 degrees(leading edge). With the extra length I hoped it would not pick up too much weed. The tip is slightly swept for the last 50mm so this is effectively more rake in the area prone to catching weed. This tip is also the only area with any twist or flex which is the way I like it! The fins are very well finished without any clearcoat on the foil to hide the contour lines. The base is cast in PU which is easy to sand for a perfect fit in the box.

23 @ 40 degree rake top, 27 @ 35 degree rake bottom
The only experience I have had with weed fins is a couple of G10 JP weeds. I found the 36 terrible and I think this was mainly due to the material not being suitable for a heavyweight sailor. In a much shorter fin (<30) the differences between Carbon and G10 weed fins are much less. Combining the wide base of a new style speed fin with the rake of a weed fin results in a nice stiff design with good dependable performance.

Comparing a 23 Slingshot and 23 Delta Speed Weed.
The weed at Lake George is 20-30cm long and starting where there is less than 20cm of clear water above is very hit and miss. If you start without being fully powered the tail bogs down and you soon rake up a nice collection of weed. The weed is like string as apart from the more ribbon like seagrasses and once up an planing you can feel a slight slowing of the board in thick weed if the tip touches but I cuts through nicely even at a 35 degree rake. The 23 at 40 degrees had even less resistance but this is probably a combination of the reduced length and increased rake. The lack of resistance through the weed really allowed you to push it off the wind into flatter shallow water without fear of a weed brake being applied. Heading upwind I was really pinching and like to bury the windward rail and not rely on fin lift. This is a common technique for a speed setup as you are not after upwind performance from the fin, just enough to keep the board tracking nicely off the wind. Sailing across the wind I found myself burying the windward rail a bit also but again the 27 fin in the Falcon 89 is more of a speed setup and I managed a 42 knot peak without too much effort and could have done with a lot more sail power. The 23 in the 49 with the same conditions got to a 43 peak so not too much difference there and the 89 would probable require less energy if speed sailing a full day. The Delta weeds could really be pushed with a lot of back foot pressure off of the wind and never let go or tail-walked. They were also very safe in the round-up at the end of the run as you hit the sharp chop, so safe infact that I was pulling on the outhaul to flatten the sail for the upwind return leg while rounding up! The other comforting fact was that the fin didn't seem to be the limiting factor to higher speeds, it was the lack of sail pressure off the wind.
Summary
I would thouroughly recommend the Vector Fins Delta Speed Weed to anyone wanting to speed sail in light to moderately weedy areas with slalom and speed boards 90L and below. I think the wide base design would also suit slightly longer fins than the current longest fin of 27cm so I will be keeping an eye on the vector fins site.
Vector Fins Delta Speed Weed is available in 19, 21, 23, 25 & 27cm from Vector Fins Pacific & Scandanavia
GPS Sessions using the Delta Speed Weed:
Saturday, 11 February 2012
DIY - Windsurf Boom Re-grip
I had to re-grip an old X9 boom recently as the glue on the old one had perished. I took the opportunity to give it a makeover and bought a new 2011 grip. Here is how I did it...
 Step 1
Lay out the new grip on a flat surface overnight to remove any bend lines, this will make it much easier to position when sticking it to the boom. Remove the boom head to allow the boom grip covers to slide back. I took the opportunity to lay some glass over the back of the boom that wears during use. Glass has a much higher resistance to wear that carbon.
 Step 2
Remove the old grip, in my case the old grip was literally falling off so the sections remaining were easy to peel and clean back to the glass outer layer. To get off the remaining glue i used the side of a chisel as a scraper being sure not to scrape away the glass wrapped carbon wall. The grip caps near the head of my x9 boom slid back and out of the way.A quick wipe with acetone removed the remaining traces - be sure not to soak it as it could afffect the resin even though it has cured. Mask off the ends at the point where you want the new grip to finish.
 Step 3
Brush on a coat of contact adhesive to the inside of one of the new boom grips. I used Sellys Kwik Grip. Make sure that any logos will finish the right way up and that the boom tail clips are in the correct orientation. Be sure to coat all of the grip with a decent layer first time around as it doesn't like to be re coated once it starts to skin. I started 20cm from one end and held the grip down with one hand, I then brushed towards the end of the grip. Once the 20cm section was done I moved in another 20cm and so on. This method allows you to coat the boom evenly without disturbing the glue finish with your other hand. The other benefit of this method is that the grip is held flat where you are brushing - as the glue starts to skin the grip curls up. You need to keep the grip in this arch shape until it is touch dry and can be stuck to the boom. When the boom grip is touch dry it will flatten out slightly (touch dry is when the glue does not stick to your finger but leaves an imprint ie. not completely dry).


 Step 4
Brush a coat of glue on one of the boom arms (the one matching the coated grip;) and hang it until touch dry.


Step 5
Fit the boom grip - Start at the front of the boom arm. Place the front of the grip in-line or slightly over the masking tape. Align the outer most edge of the boom with the centre of the boom grip and slowly rock the boom in a single motion until the grip has stuck to the entire length of the boom down the centre of the grip. Now turn the boom over so the grip faces up and run your palm down the centre of the grip. Start to roll over the top half of the grip only(do not do the bottom half just yet). Keep gradually sticking the grip to the arm in small sections by runing your palm back and forth to alow them to come together gradually and evenly. This is very important in the curved area of the boom as the grip will try to gather and rinkle. Stop once the grip has covered the top half of the boom arm, run your finger down the inside of the arm to create a straight glued edge. Now with a sharp snap-off type knite blade cut the grip to trim the excess. You want to rest the knife on the edge of the glued line so that it is tangiental to the boom section. Try to trim the whole grip in one step to keep a nice straight line. The glue might get scraped slightly as the nife passes by, don't worry as now you have to give the trimmed edge of the top half a coat of glue. Be sure just to coat the angled cut face and the areas that were scraped by the knife. Allow to touch dry.

Wrap the bottom half of the grip around the boom in the same way as the top was applied. Make sure the grip has stuck fully to the cut face that was touched up in the previous step.
Step 7
Trim the excess of the bottom half of the grip and sand the final ridge flush with the surounding grip using 80grit sand paper. There will be a slight glue line, use this as a guide to getting the sanding even(assuming your cut was even when trimming the top of the grip)


Trim the ends of the gip up to the edge of the masking tape. Remove the tape and replace the boom grip caps and glue if required.


Lay out the new grip on a flat surface overnight to remove any bend lines, this will make it much easier to position when sticking it to the boom. Remove the boom head to allow the boom grip covers to slide back. I took the opportunity to lay some glass over the back of the boom that wears during use. Glass has a much higher resistance to wear that carbon.

Remove the old grip, in my case the old grip was literally falling off so the sections remaining were easy to peel and clean back to the glass outer layer. To get off the remaining glue i used the side of a chisel as a scraper being sure not to scrape away the glass wrapped carbon wall. The grip caps near the head of my x9 boom slid back and out of the way.A quick wipe with acetone removed the remaining traces - be sure not to soak it as it could afffect the resin even though it has cured. Mask off the ends at the point where you want the new grip to finish.

Brush on a coat of contact adhesive to the inside of one of the new boom grips. I used Sellys Kwik Grip. Make sure that any logos will finish the right way up and that the boom tail clips are in the correct orientation. Be sure to coat all of the grip with a decent layer first time around as it doesn't like to be re coated once it starts to skin. I started 20cm from one end and held the grip down with one hand, I then brushed towards the end of the grip. Once the 20cm section was done I moved in another 20cm and so on. This method allows you to coat the boom evenly without disturbing the glue finish with your other hand. The other benefit of this method is that the grip is held flat where you are brushing - as the glue starts to skin the grip curls up. You need to keep the grip in this arch shape until it is touch dry and can be stuck to the boom. When the boom grip is touch dry it will flatten out slightly (touch dry is when the glue does not stick to your finger but leaves an imprint ie. not completely dry).

Freshly brushed glue makes the grip arch...

Grip glue flattens when touch dry...

Sellys Kwik Grip contact adhesive.

Brush a coat of glue on one of the boom arms (the one matching the coated grip;) and hang it until touch dry.

Trimming the top half of the grip.

Top half trimmed.
Step 5
Fit the boom grip - Start at the front of the boom arm. Place the front of the grip in-line or slightly over the masking tape. Align the outer most edge of the boom with the centre of the boom grip and slowly rock the boom in a single motion until the grip has stuck to the entire length of the boom down the centre of the grip. Now turn the boom over so the grip faces up and run your palm down the centre of the grip. Start to roll over the top half of the grip only(do not do the bottom half just yet). Keep gradually sticking the grip to the arm in small sections by runing your palm back and forth to alow them to come together gradually and evenly. This is very important in the curved area of the boom as the grip will try to gather and rinkle. Stop once the grip has covered the top half of the boom arm, run your finger down the inside of the arm to create a straight glued edge. Now with a sharp snap-off type knite blade cut the grip to trim the excess. You want to rest the knife on the edge of the glued line so that it is tangiental to the boom section. Try to trim the whole grip in one step to keep a nice straight line. The glue might get scraped slightly as the nife passes by, don't worry as now you have to give the trimmed edge of the top half a coat of glue. Be sure just to coat the angled cut face and the areas that were scraped by the knife. Allow to touch dry.

Bottom half glued.
Step 6Wrap the bottom half of the grip around the boom in the same way as the top was applied. Make sure the grip has stuck fully to the cut face that was touched up in the previous step.
Step 7
Trim the excess of the bottom half of the grip and sand the final ridge flush with the surounding grip using 80grit sand paper. There will be a slight glue line, use this as a guide to getting the sanding even(assuming your cut was even when trimming the top of the grip)

Sand the overlap flush.

Sanding complete.

Re-fit to grip caps.
Step 8Trim the ends of the gip up to the edge of the masking tape. Remove the tape and replace the boom grip caps and glue if required.

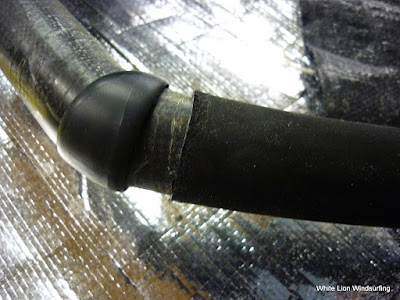
Re-fit the head components.
Step 9
Re-fit the head components and harness lines and allow the glue to fully cure overnight before using the boom.
Here are the animated steps(yellow is the brushed contact adhesive)
The re-gripped boom in action on the following day...

Friday, 3 February 2012
Lake George 2012-01-31
I had the good fortune of another trip to Lake George (big thankyou to my Wife ;) and this time I made sure I got some photos and video footage. When I came 10 days ago I was focused on getting some pb's and so using the GoPro was another complication I could do without. The morning was a change from the other days with a light 15-20 knot breeze and overcast conditions. This allowed Lake George to show off its legendary glasssy conditions!


Gear rigged for the day.

Choco & Hamma

The Long Walk

Carpark

The trudge out

The drag to deeper water

Weedy start

Weed wake

Kato

Tricky

Falcon 89 Deck Concave

Daffy

Wake

Time check

Choco

Spotty
Glass in 20 knots!!!

Glassy gybe exit

More wake

Dave

Hard to gybe badly here...
 Near miss with Choco...
Subscribe to:
Comments (Atom)