The board bags on the 2012 Fanatic site show the sizing of the upcoming and yet to be released 2012 Fanatic Falcon range of slalom boards...
XS (245 x 57)
NewWave 69 / 76 / 83, FreeWave 75, NewWave Twin 72 / 79, Quad 75 / 81, all Falcon Speeds
S (247 x 62)
NewWave 91, NewWave Twin 86 / 93, Quad 87 / 94, FreeWave 85 / 95, Hawk 100, Falcon Slalom 89, Ray 100, Skate 89
M (249 x 66)
FreeWave 105 / 115, Skate 99 / 109, Shark 105, Hawk 110, Falcon Slalom 99
L (258 x 70)
Shark 120, Ripper 102, Ray 115, Falcon 113, Hawk 120, Ripper 120
XL (268 x 85)
Shark 135 / 150 / 165, Falcon 125 / 140 / 165, Ray 130 / 145, Hawk 135
Looks like;
>the 85 is now 89
>the 102 is now 99
>the 111 is now 113
>the 122 is now 125
>the 134 and 148 have been replaced by a 140.
Widths are anyones guess but based on the popularity of the 2011 shapes I am sure there will only be slight tweaks rather than wholesale changes.
Tuesday, 16 August 2011
JP Slalom VIII 2012 Sizes
I always like to check out the JP board bag sizing for the coming year as it usually has models which have not been put on the website.
JP Slalom VIII Range
59
66
68
78
84
I am pretty sure there will be a smaller size also that is not added to the small board bag list:
http://www.jp-australia.com/2012/index.php?id=647
It appears the larger boards have been resized:
The 76 is now 78cm wide.
The 82 is now 84cm wide.
There have been other leaks on the web but this is on the official website;)
New JP Super Light Wind 2012

JP have added a second size of SLW to complement the original 90cm design.
The 92cm SLW is like a scaled up X-cite Ride and is 16cm longer than the 90 and both come with a moulded 56cm carbon fin. The 92 also has an inboard strap option and 11L more flotation enhancing its appeal for begginers and intermediates.
The 92 is available in FWS and PRO construction, the 90 is available in PRO and GOLD construction.
Sunday, 7 August 2011
JP Speed 2012

JP have released the 2012 speed range with one upgraded design; the 49 is now a 50 and has been designed to complement the new wide base style of weed fin pioneered by C3. Looking at the plan the nose looks a little wider and spoon like reminiscent of the Carbon Art speed boards. It appears that the boards are no longer supplied with fins, it would be great if they came with a C3 Slingshot!
Friday, 20 May 2011
Fin Screw Tabs
I had to make some washers for my fin screws tonight and thought I would make it easier to insert and remove them from the recessed holes on my boards with standard tuttle boxes. The holes are recessed about 25-30mm below deck level and are too small in diameter to get a finger either side of the screw head. By extending the rubber washer into a strip, two tabs are created allowing the screw to be placed perfectly. I dont know why I haven't done this before as most of the time when I need to get the screws out I have resorted to tipping the board upside down and shaking them out. You can sometimes guide the screw in and remove it on the tip of the screwdriver but this is hit and miss and magnetic tips don't work on 316 stainless.


Fin Screw Tabs - Easy insertion and extraction!

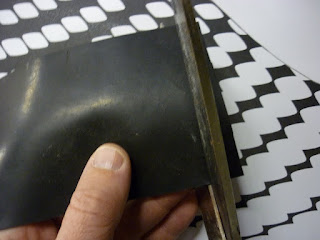
Cut strips out of 1.5mm Neoprene Rubber - 100mm x 17mm

Wad punch centre of strips with 3/16 punch

Hole wad removed.

Place the screw & washer into the strip and bring the tabs together.

Insert into recess, alight tabs with water flow;)

Tighten.
Sunday, 15 May 2011
DIY - Fins - Power Box to Tuttle Head Conversion
The conversion of a Power Box Head to Tuttle Head can be quite easy depending on the brand and head material used. I recently modified some Techtonics fins with PB heads to Tuttle for a friend. The fins were originally PB for use on older F2 Sputniks, they needed to be converted to Tuttle for use on JP Slaloms. .
The quickest and easiest conversion is when the position of the fin in the PB is to be carried over into the Tuttle Box. A Power Box head fits into a Tuttle mould with minimal modification to the front and rear face of the head. If the length and angle of the fin are to be modified in the conversion then there are a few more steps required. I used both methods as one of the fins was to remain a 40cm Tomcat, the other fin, a 32cm Falcon was shortened to 30cm.
To do a conversion you will need a Tuttle Head Mould, Epoxy Resin(cast urethanes can be used but the method described below suits laying up reinforcements) and various fillers. I will cover making a Tuttle Mould in another article. Wear a dust mast and use a vacuum cleaner whenever cutting composites.
Maintaining Geometry - Keeping the same length, rake and position.
Make a cardboard or thin plywood template of a Tuttle head(side). Make this as accurate as possible as you will be cutting fin heads to this shape. Place the template on the PB head with the tip of the leading edges aligned. The PB front face will be curved, the Tuttle will be straight. Mark the outline of the Tuttle Head using a marker or pencil and cut off the excess using a hack saw. It is better to take of a little more rather than less as filing is more time consuming that cutting. Smooth out the cut faces using a file and add a radius to match that on the Tuttle Head - about 5-6mm depending on who manufactured the reference fin. Sand the remaining faces of the PB head with coarse paper to key into the filler that will be laminated to it.

Shaped PB Head sitting in the Tuttle Mould.
Check the fit in the Tuttle mould, you want to have about a 1/4 of a millimetre to allow for a couple of layers of carbon or glass. Bring both sides of the mould together and again check there is a about a 1/4 of a mil down the one side. The mould pictured above can be used to cast standard and deep tuttle heads. In standard mode I have infill pieces in the mould.
Shortening the Fin in the Head Conversion
If the fin is to be shortened then there will be less or none of the original PB head left attached to the body of the shortened fin. In the case of the 32cm Falcon being shortened to 30cm there was about half of the head left. Since the bottom face of the PB head will not be flush with the Tuttle Head mould a pair of flushing plates will need to be made. This will be covered in a dedicated DIY article. If the fin is shortened more than 4cm then there will be none of the PB head remaining. In this case it is a standard tuttle re-box with more filler and flushing plates required. Tuttle Fin Re-Box S10
The Support Jig
The jig I use to support the fin is designed to swing down onto the bottom half of the mould. The setup is done before the layup so that the fin stays fixed in the desired position. I have tried many different methods which usually invlove laying up the mould, closing the mould, adding filler and then shoving the fin in. The fin support jig then needs to be attached and you sometimes find yourself fighting the position that the fin was inserted.at. This results in more unwanted movement of the reinforcement and airbubbles in the filler.
Fins that are cast with the tip above the mould(vertically) have the flexibility of several finishing options for the top face(face flush with the deck). The top face can be "floated" or moulded flat with a single or pair of flushing plates. The floating method involves simply filling the mould so the the top face self levels to flush with the top mould face. The advantages of this is that it is quick and there is minimum finishing required. The disadvantages are that bubbles can rise to the top surface leaving a textured porus surface depending on the materials used. Also, if even a small amount of resin leaks from the mould the top face will cure low and will need to be built back up. Flushing plates take more preperation but deliver a more consistant finish.
The support blocks are made by casting slotted pads from a tuttle fin placed in the mould. Tape off the fin in the areas that will be cast using several layers of masking tape. 3 areas are ideal, 2 at either end of the leading edge and 1 in between the front pads but placed on the trailing edge Find some wooden blocks that can be screwed to the hinged base plate, the bottoms must be nice and flat without any rock. I use a long block on the leading edge and a single one at the back combined with a sliding g-clamp to locate the fin securely. Use some polyester putty to cast a pad in the areas that the fin has been taped off. I will do a seperate article on creating a Fin Support Jig.
Laying up the head.
Using the Cardboard Tuttle Head Template cut out 4 layers of Carbon or Glass cloth, 2 for each side of the head. Use masking tape to cover the bottom face of the PB head and the adjoining foil surfaces. Wax the head mould halves and coat the inside the mould and the sanded PB head with neat epoxy resin. Layup the 2 layers of cloth in each half of the mould. Add talc, chopped carbon and a touch of carbon black to the neat resin to make the special sauce. Butter each side of the mould with enough filler to fill the head completely as well as sqeeze out through the part line. Swing the fin jig into place and spread the displaced filler over the fin head being sure not to create air bubbles. Place the other half of the mould in place and clamp the down tight. Allow to cure overnight.
The photos shown below are for the Falcon that was shortened by 2cm.

Carbon Cloth cut and mould waxed.

Talc & Chopped Carbon Fibres added to the epoxy resin.

2 Layers of CF Cloth layed into each mould half.

Mould closed with flushing plates in place.


Half of the Tuttle Mould Removed.


Flash and Masking Tape.


Flash Removed.


Barrel Nuts Fitted.


The finished 40cm Tomcat that didn't need flushing plates.


Both fins finished.
40cm Tomcat Left, 32cm Falcon shortened to 30cm Right.
40cm Tomcat Left, 32cm Falcon shortened to 30cm Right.
Saturday, 30 April 2011
Fanatic Falcon 111 Review (2011)
I have now had a few sessions on my recently acquired Fanatic Falcon 111 so I thought it was time to share my thoughts and initial impressions. All sessions so far have been with a 7.8m Evo III but I have used two fins from Select - a 41cm S11 & 37 S10. Conditions have ranged from a gusty 12-17 knots and choppy water up to 30 knot days with both big chop and flat water sections. Locations were the fresh water Boggy Lake and salt water Lake George, both are located in South Australia. Test dummy is 110Kg and 193cm with over 20 years sailing experience.

Design
The first Falcon I ever owned was the 111 from 2006. Back then the design was quite a bit different; mono concave tail, double concave mid section and an overall length of 245cm. Over the past 5 years the concept has evolved into a well rounded racing and fast freeride machine.

Hull - The current design has a double concave in the nose and mid section that runs until 40cm from the tail and washes out into a spiral "power vee". There is no tail kick and the rails have a comfortable amount of tuck throughout.
Deck - The most noticible features on the deck are the modified volume distribution and the recessed mast track / deck concave. The larger volume from the front straps back allows a nice amount of deck roll which increases comfort levels and allows you to sail faster for longer. The rear straps are very clost to the tail and as a result the centre of your rear foot is directly over the leading edge of the fin. The stance width of 520mm(front strap second hole from the front, rear strap 3rd hole from the front) is quite a bit narrower than other brands are using and combined with the rear strap placement it allows a really connected ride on the fin and means you don't have to bend the back leg too much on deep speed runs.

Hull Graphics - As with the other boards in the fanatic range, the falcon has been given a macke over in the graphics department. The hull is a combination of black base coat with airbrushed silver outline. The paint is then screen printed over creating the white fanatic logo pattern. You can feel a raised area on the edge of the screen printing but is does not seem to adversely affect water flow. A light rub with wet and dry would take the edge off but this may affect resale value. The paint and screen print both have a matte finish unlike some of the other boards in the fanatic range which also use gloss in combination with matte finishes. This suits a dedicated slalom board well.
Deck Graphics - The deck has the bi-axial carbon finished with a clear resin, the rails are silver and airbrushed to fade into the carbon deck. A full clear vinyl transfer with red and white screen printing is then applied with non-skid and pads applied over the top. Full vinyl deck graphics are pretty standard these days but an unpainted full carbon weave is uncommon. It shows that high performance materials are actually used rather than hiding cheap materials under full deck graphics. Care should be taken not to leave the deck(and hull) in direct sun on really hot days as delamination could occur if the laminate gets super hot.

Design
The first Falcon I ever owned was the 111 from 2006. Back then the design was quite a bit different; mono concave tail, double concave mid section and an overall length of 245cm. Over the past 5 years the concept has evolved into a well rounded racing and fast freeride machine.

Hull - The current design has a double concave in the nose and mid section that runs until 40cm from the tail and washes out into a spiral "power vee". There is no tail kick and the rails have a comfortable amount of tuck throughout.
Deck - The most noticible features on the deck are the modified volume distribution and the recessed mast track / deck concave. The larger volume from the front straps back allows a nice amount of deck roll which increases comfort levels and allows you to sail faster for longer. The rear straps are very clost to the tail and as a result the centre of your rear foot is directly over the leading edge of the fin. The stance width of 520mm(front strap second hole from the front, rear strap 3rd hole from the front) is quite a bit narrower than other brands are using and combined with the rear strap placement it allows a really connected ride on the fin and means you don't have to bend the back leg too much on deep speed runs.

Recessed Mast Track / Deck Concave
Hull Graphics - As with the other boards in the fanatic range, the falcon has been given a macke over in the graphics department. The hull is a combination of black base coat with airbrushed silver outline. The paint is then screen printed over creating the white fanatic logo pattern. You can feel a raised area on the edge of the screen printing but is does not seem to adversely affect water flow. A light rub with wet and dry would take the edge off but this may affect resale value. The paint and screen print both have a matte finish unlike some of the other boards in the fanatic range which also use gloss in combination with matte finishes. This suits a dedicated slalom board well.
Deck Graphics - The deck has the bi-axial carbon finished with a clear resin, the rails are silver and airbrushed to fade into the carbon deck. A full clear vinyl transfer with red and white screen printing is then applied with non-skid and pads applied over the top. Full vinyl deck graphics are pretty standard these days but an unpainted full carbon weave is uncommon. It shows that high performance materials are actually used rather than hiding cheap materials under full deck graphics. Care should be taken not to leave the deck(and hull) in direct sun on really hot days as delamination could occur if the laminate gets super hot.
Sailing
From the second you step onto the board you can feel the increased buoyancy in the tail. There is no problem with the nose sinking when off the plane as long as you have a little power in the sail to keep you moving slowly. In transitions you have to remember to be slightly tail biased but this is easy to get used to. The water flows well around the stern and the board un-sticks easily. Pumping the board onto the plane in marginal conditions is relatively easy and finding the right trim is intuitive. Just using leg pumping seems more easy than other slalom boards as the board "feels" very light in the water and doesn't need a really big fin to hold a straight course. The large amount of spiral vee certainly aid this directional ability and once up and planing give the board a very lively and maneuverable feel. Direction changes can be swiftly executed allowing for efficient negotiation through both confused chop and long snaking trough lines. If however you do have to go over steep chop head on the hull shows little sign of slowing and feels very efficient. In very steep chop it was easy to sheet out slightly to lift the nose while maintaining full board control.

A 41cm S11 was used only on a marginal wind day so the full upwind potential could not be tested for figure-8 racing but even just powered you could point high with good speed. The main use I have for the board is GPS speedsailing and it fills this role perfectly. The board was very fast and easy to sail off the wind and it was really easy to keep the tail locked down and sailing flat. I found that the vee and slightly narrower tail minimised the rocking from side-to-side that you sometimes get on wider tail boards with sail power changes and harsh chop.
Gybing was easy to initiate and the rail held well in choppy conditions. The board seemed to prefer to be gybed with equal or slight rear foot bias depending on the entry speed and sail power available. No tacks were attempted as I rarely need this manoeuvre when speed sailing.
From the second you step onto the board you can feel the increased buoyancy in the tail. There is no problem with the nose sinking when off the plane as long as you have a little power in the sail to keep you moving slowly. In transitions you have to remember to be slightly tail biased but this is easy to get used to. The water flows well around the stern and the board un-sticks easily. Pumping the board onto the plane in marginal conditions is relatively easy and finding the right trim is intuitive. Just using leg pumping seems more easy than other slalom boards as the board "feels" very light in the water and doesn't need a really big fin to hold a straight course. The large amount of spiral vee certainly aid this directional ability and once up and planing give the board a very lively and maneuverable feel. Direction changes can be swiftly executed allowing for efficient negotiation through both confused chop and long snaking trough lines. If however you do have to go over steep chop head on the hull shows little sign of slowing and feels very efficient. In very steep chop it was easy to sheet out slightly to lift the nose while maintaining full board control.

The Falcons comfy stance is narrower than most slalom boards...
A 41cm S11 was used only on a marginal wind day so the full upwind potential could not be tested for figure-8 racing but even just powered you could point high with good speed. The main use I have for the board is GPS speedsailing and it fills this role perfectly. The board was very fast and easy to sail off the wind and it was really easy to keep the tail locked down and sailing flat. I found that the vee and slightly narrower tail minimised the rocking from side-to-side that you sometimes get on wider tail boards with sail power changes and harsh chop.
Gybing was easy to initiate and the rail held well in choppy conditions. The board seemed to prefer to be gybed with equal or slight rear foot bias depending on the entry speed and sail power available. No tacks were attempted as I rarely need this manoeuvre when speed sailing.
Short Gybe video playing with a boom tail mounted GoPro.
Construction
The hull utilises a basalt cloth which feels robust and combined with a bi-axial carbon deck the boards fells both light and stiff. This is a high performance board and should be treated as such, the deck will ding easily if impacted so take care.
Technical Data

SessionsThe hull utilises a basalt cloth which feels robust and combined with a bi-axial carbon deck the boards fells both light and stiff. This is a high performance board and should be treated as such, the deck will ding easily if impacted so take care.
Technical Data

http://www.gps-speedsurfing.com/default.aspx?mnu=user&val=74102&uid=1049
http://www.gps-speedsurfing.com/default.aspx?mnu=user&val=74762&uid=1049
http://www.gps-speedsurfing.com/default.aspx?mnu=user&val=74909&uid=1049
http://www.gps-speedsurfing.com/default.aspx?mnu=user&val=74912&uid=1049
Action Video
Coming soon...
Subscribe to:
Posts (Atom)